Today is the final day of the Raspberry Creek Fabrics Suit Up for Summer Tour and I’m sharing some tween sewing as well as a little tutorial on how to add coverage and support to your swimsuits.
As the tour comes to an end, I’m filled with mixed emotions. It’s been great to have a reason to get behind my sewing machines and also to share a little bit of hope and brightness with the community. Deadlines are great motivators! Not gonna lie though, I can’t wait to take a little break too! It feels awesome to have a head start on the swim season but I’m ready to sew some cozy stay at home clothes now. My emotions have been right on the surface lately and tucking away to my sewing space every now and then is still the perfect way to recharge and emerge ready to tackle the rest of the day. Have you been sewing or is it a struggle to find the time and motivation? This sewing community has been so supportive and it’s great to know that whether we’re sewing up a storm or just scrolling the web for inspiration, we’re all in this together!

For today’s post I’m sharing two swimsuits I made for my oldest daughter as well as how to add cups and elastic for a little bit of support and coverage. I’ve got an easy women’s rash guard with support coming at you too!
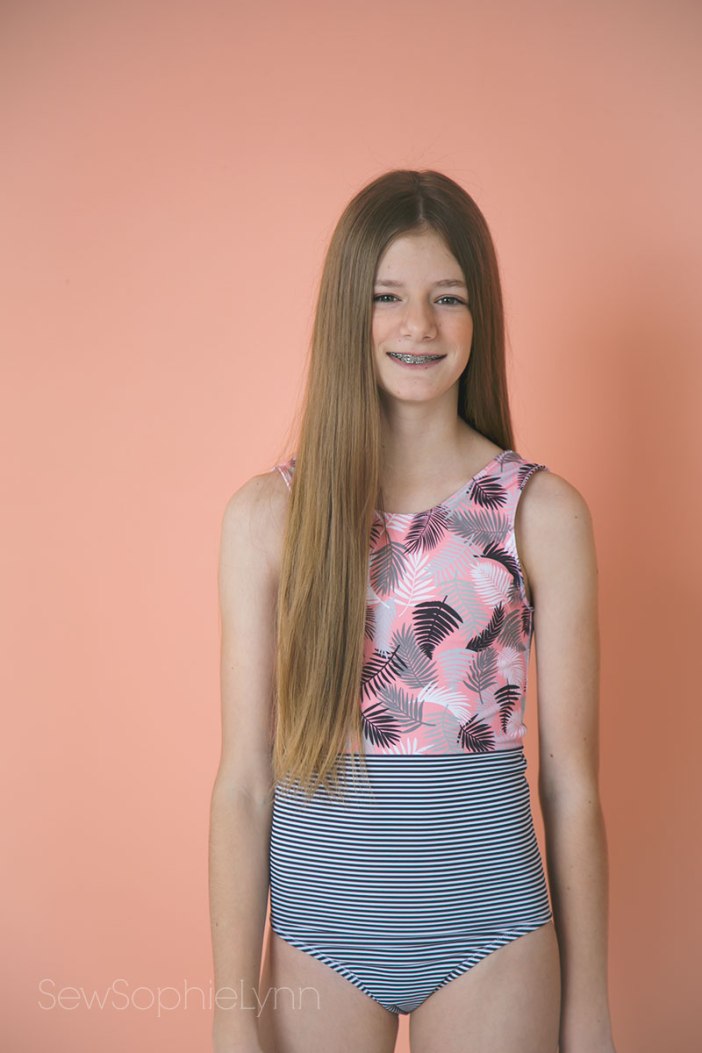
For these suits I used Coral Black and Grey Palm Leaf paired with Black Micro Stripes and Bright Pink and Navy Palm Leaves. You know I like to let my kids pick their fabrics and this girl always manages to choose the same ones I would want myself!
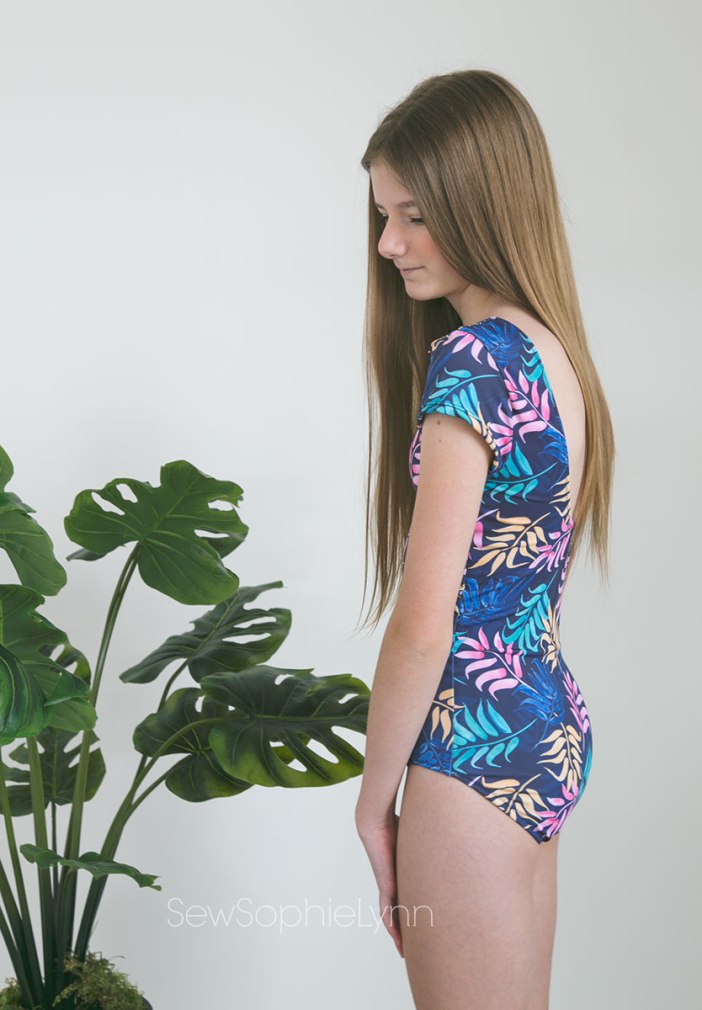
As soon as the Tadah Hapuna Swimmers and Leotards hit the scene I knew I needed to make one (or two!). This pattern is full of options and they’re all adorable! There’s a front color block bodice, a v-back or scoop back, one or two pieces, and so many cute sleeve styles. I really want to make a version with the circle flounce sleeves but this one wasn’t having it.

This pattern is full of measurements so I was able to get a great fit with our first suit. I sewed up a size 10 width graded to a 12 through the waist and a 13 length. This is the round scoop back with cap sleeves.

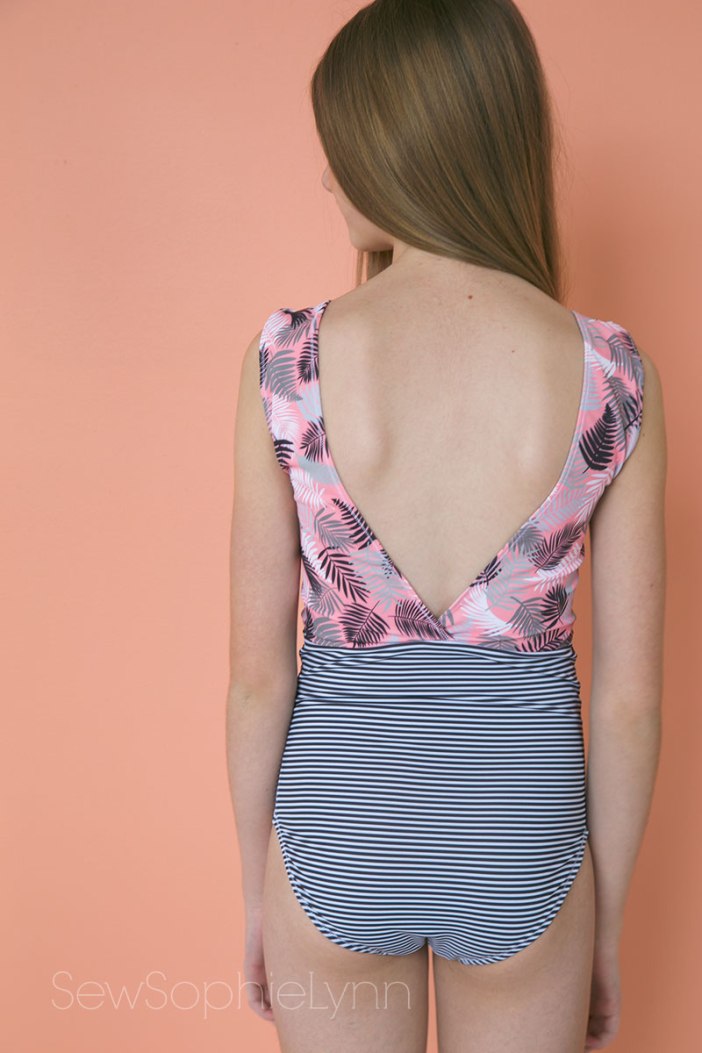
For this version I used the same front bodice piece and color blocked the front to match the v-back color blocking.

Just looking at that long and lean body you can tell that store bought suits just don’t fit this girly. We recently tried to buy one she fell in love with online for our Hawaii trip and I had to alter it by bringing it in a full 1.5″ on each side! Grateful I could make it work but even more grateful I can sew suits that fit her even better!
 This girl is just starting to develop breast buds and we wanted to add a little bit of coverage to her suits. She doesn’t need support yet but really just wanted to add some chest coverage. I’ve been adding bra cups to all my suits for years and I knew some light foam cups would be just what she needed. Here’s how I did it:
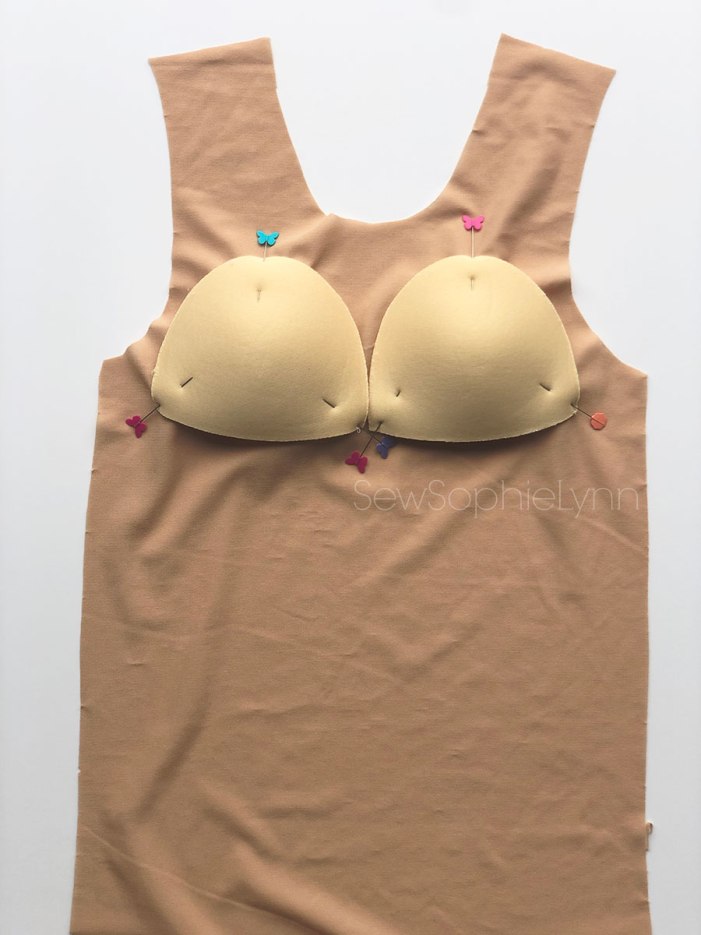 First, I had her hold up the lining front piece. We positioned the cups accordingly. I used light foam cups, similar to what you find in sports or lounge bras. In fact, I save all of the cups from old lounge bras to re-purpose for my swim suits. I also like to stock up when I hit the LA fabric district (they’re a screaming deal at like 4 for $1). Wawak is another option for cups and these ones are light and would work great for tweens. They come in multiple sizes which is perfect for our little girls. One more option would be to buy bra making foam sheets and cut your own cups to fit. Etsy has loads of retailers that stock it.

 Next, sew your cups on with a zig zag stitch. I like to sew over the cup edge to really smooth the edge and make it not as noticeable from the outside of the suit. Depending on the thickness of your main swim fabric, you can sew your cups on either the right or wrong side of your lining. With thick quality fabric like Raspberry Creek, I usually put the cups on the wrong side of the lining between the lining and main fabric. I find it more comfortable to not have the actual cup against my skin but it really works either way. For my rash guard, I did the cups against my skin so you can see them more clearly in the tutorial.
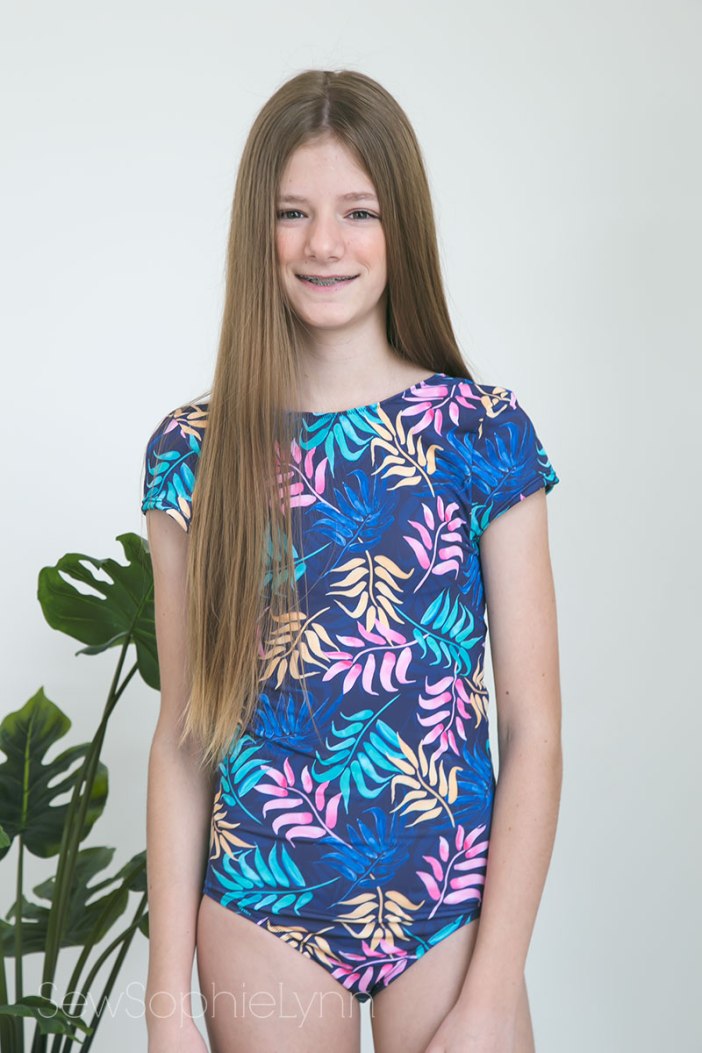 I love the results of adding this little bit of coverage. I also hand sewed cups to the lining of an already finished suit and she feels so much more comfortable with the extra support. This would work well for ready to wear suits too since most children’s suits don’t adapt for this in the larger sizes. This is new territory for me and I’m glad I could give my girl a little more confidence when she hits the pool this summer.
 If you or your girl need just a little more support, you can add an elastic band for a shelf bra to your suit too. I don’t need much support, just a little lift and this method is perfect for me.
 For this rash guard I used the Patterns for Pirates Layer Me Up top. You can use any tight fitting top pattern and the Layer Me Up is one of my favorites. It has lots of sleeve options and gives me a nice slim fitting swim top. I used the Black White Sage Light Blue and Blossom Pink stripe because these colors are so darn good together. I paired it with my Hello Sailor bottoms from last year for a suit that I can’t wait to wear this summer.
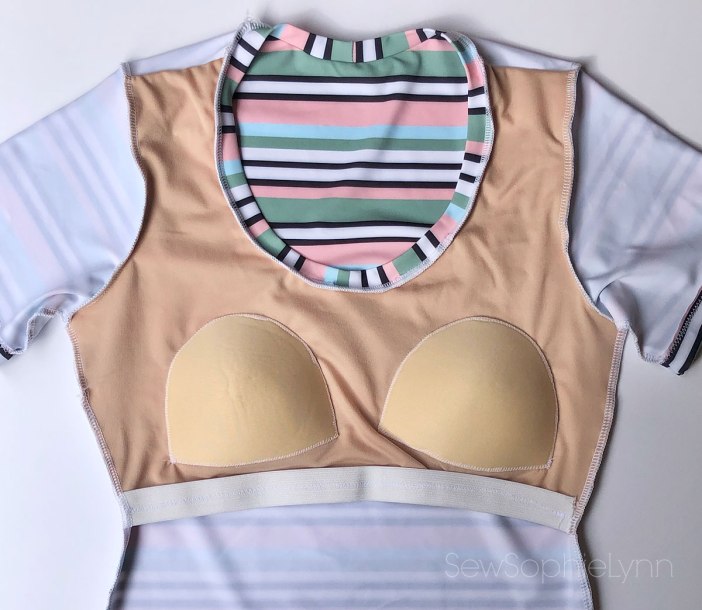 For my suit, I used the same technique as my daughter to sew on the cups but this time I sewed my lining to the front and back bodice pieces at the shoulders first so I could ensure a good fit when placing them. I don’t like to fully line my rash guards because the extra layer is a little too hot for me. In the past I have fully lined the front but this time I chose to just line the top half. To add the elastic, determine how tight you want it to be. I cut mine two inches shorter than the width of the lining where I was placing it. You will then sew your elastic to your lining, stretching it as you sew. I like to sew my elastic just outside of the side seam allowance. This prevents pulling at the side seam. I use a zig zag stitch but you can use any stretch stitch. I had cut my lining piece longer than I needed so I had some wiggle room to work with. Once I had my elastic sewn on, I trimmed off the extra lining on the bottom.
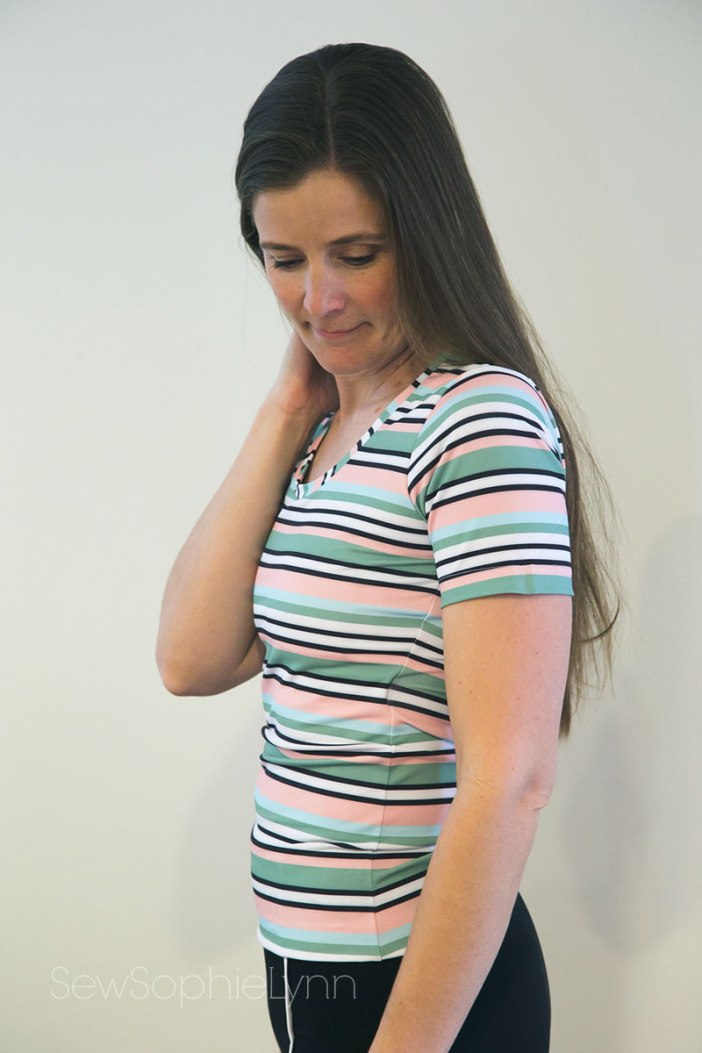

If you’re like me and just need a little support this works fantastic. I’m not much help when it comes to the more well endowed. You’ll want power mesh and possibly underwires and that’s a whole new ball game. I just know I’ve used this technique for years and I love the results.
Are you ready for the rest of the tour bloggers rounding out the tour?! So much inspiration headed to you today from It’s Liesel, House of Curves, Stitching and Making, Replicate then Deviate, and Paisley Roots.
As a special treat Raspberry Creek Fabrics is offering 15% off your entire order this weekend with code SUNSHINE.

It’s Liesel House of Curves Stitching and Making Replicate then Deviate
A HUGE thank you to all our pattern sponsors!!!

Simple Life Pattern Company Love Notions Hey June Handmade New Horizons Designs
Sew A Little Seam Jilly Atlanta Ensemble Patterns Petit A Petit & Family
Striped Swallow Designs Jennuine Designs Jalie Ellie & Mac Sew Like My Mom Lowland Kids Phat Quarters
Greenstyle Creations Chalk & Notch Made For Mermaids Lil Luxe Collection Violette Field Threads Patterns For Pirates
Rebecca Page Shwin Designs Sinclair Patterns Call Ajaire Boo Designs Tadah Patterns

I really love these suits! Your girl definitely has great style!
LikeLike