Suit Up for Summer 2021 Day Four- Tween Girl Fashion

We’re almost to the end of our week ‘o fun! I’m pretty sure I’ll go into swimsuit withdrawals when the tour ends. Good thing for you, you can still pick up Raspberry Creek Fabrics swim fabrics at 15% off with code SWIMTOUR.

Every year my girls and I go swimsuit shopping and every year we leave empty handed. We struggle so much trying to find suits that both fit their personalities and just plain FIT! My oldest daughter is now in junior sizing and somehow that means that their are even less options that work for her. It makes me so happy that I can sew both of my girls suits that really work for them.

This year I tried a few new to us patterns. The first is the Hibiscus pattern from Honeydew Kisses.

I think my girls have been a part of the design process for so long that when I asked for swimsuit ideas this year, I should not have been surprised to get this drawing from Payton. She really wanted the cutouts on the side and a fun strappy back. She was thrilled when I pulled up the Hibiscus pattern and it matched up with her vision!

I sewed up view B in a 9/10 with added length. We skipped all the ruffles to get as close to her inspiration as possible.

When I was her age, I had a very similar suit that I thought was THE COOLEST! My mom loved it because it was a one-piece and I loved it because the little cutouts seemed so grown up to me. This tie dye print just ups the rad factor!

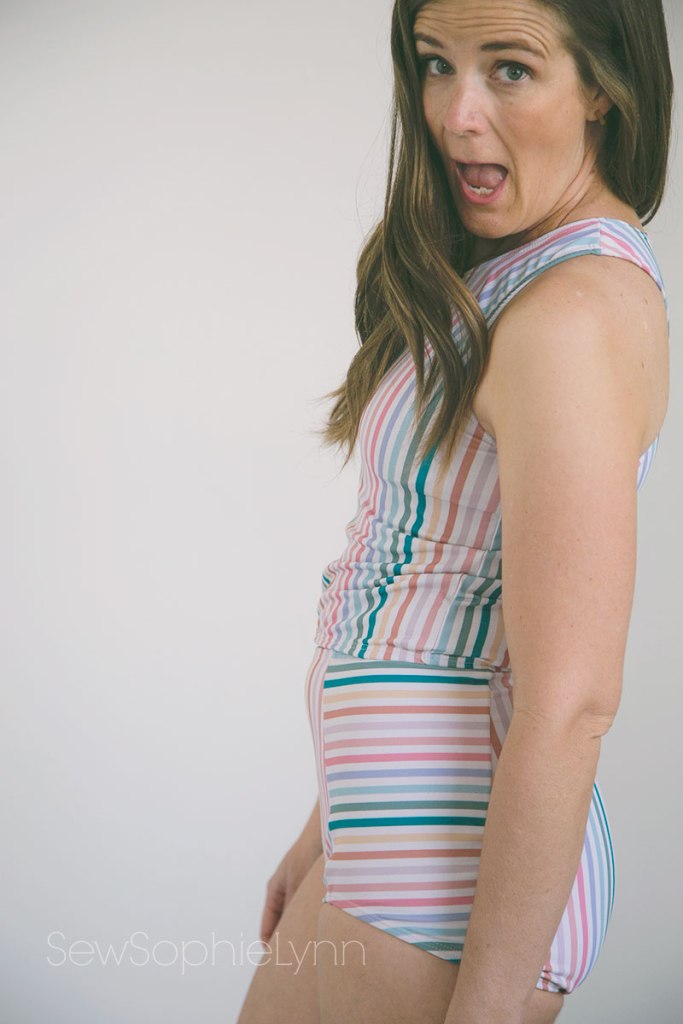
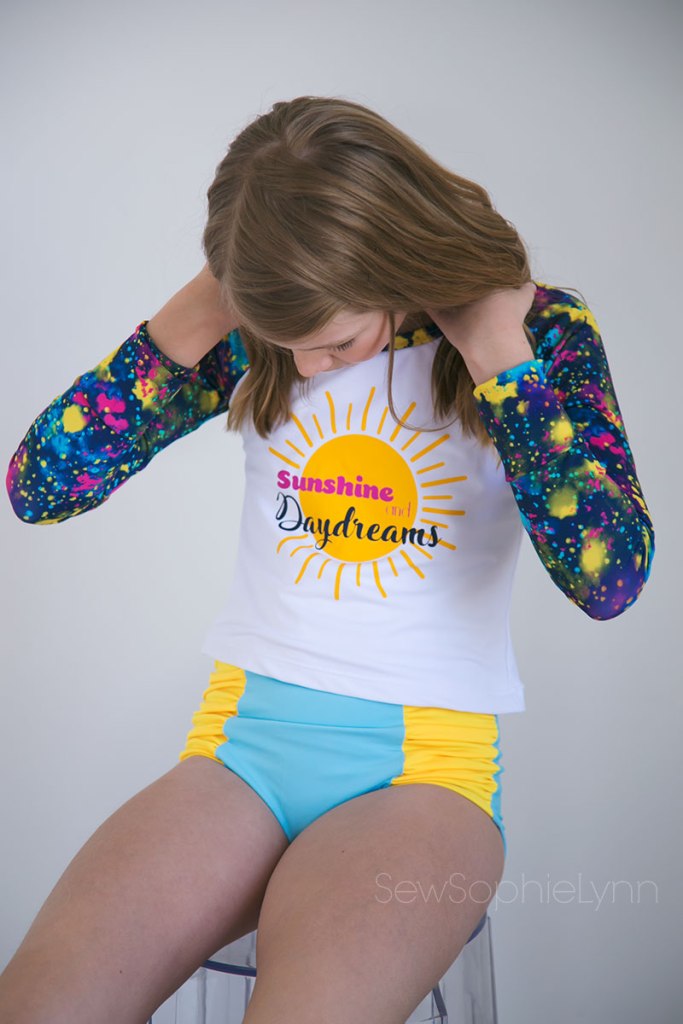
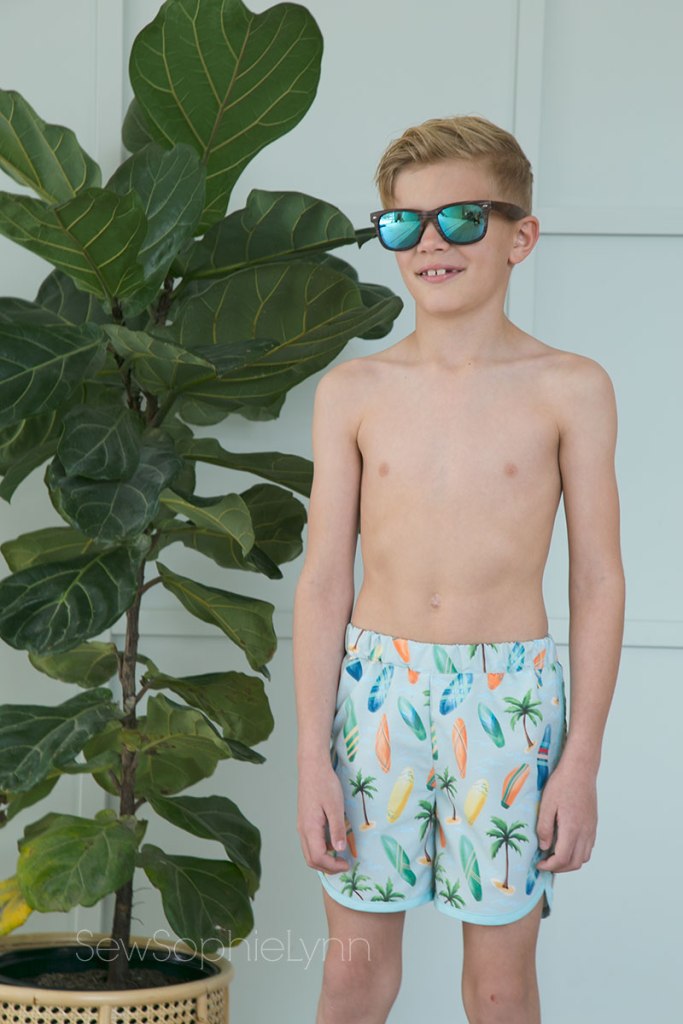
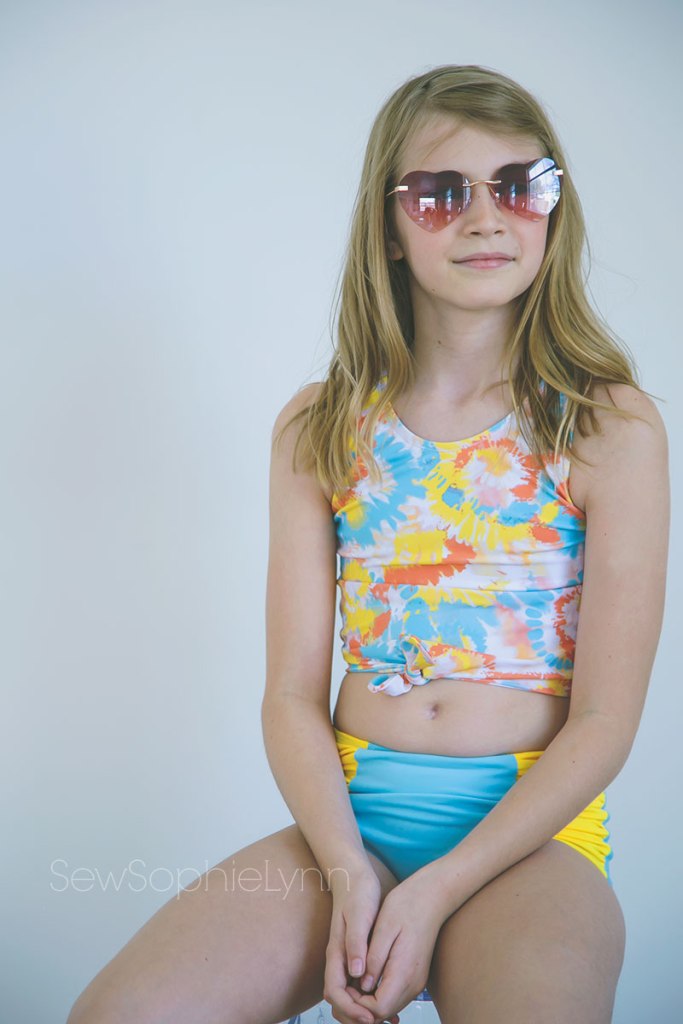
For her second suit I used the Little Lizard King Sanibel. She loves all the little tie front tops in the shops and the Sanibel is absolutely adorable! I love all of the Little Lizard King swim line and plan to work our way through them all.

We used another fun tie dye and paired it with the light blue and yellow swim solids. The colors are just so cheerful and scream summer to me!

I sewed up a size 10 classic neck tankini length top with tie and the gathered side panel bottoms. This pattern had multiple options for the top and you can add lots of little extras like flutters and ruffles too. It’s no surprise that we skipped most of those. I love that this suit feels sporty but also a little feminine with the side gathers on the bottoms and tie on the top.

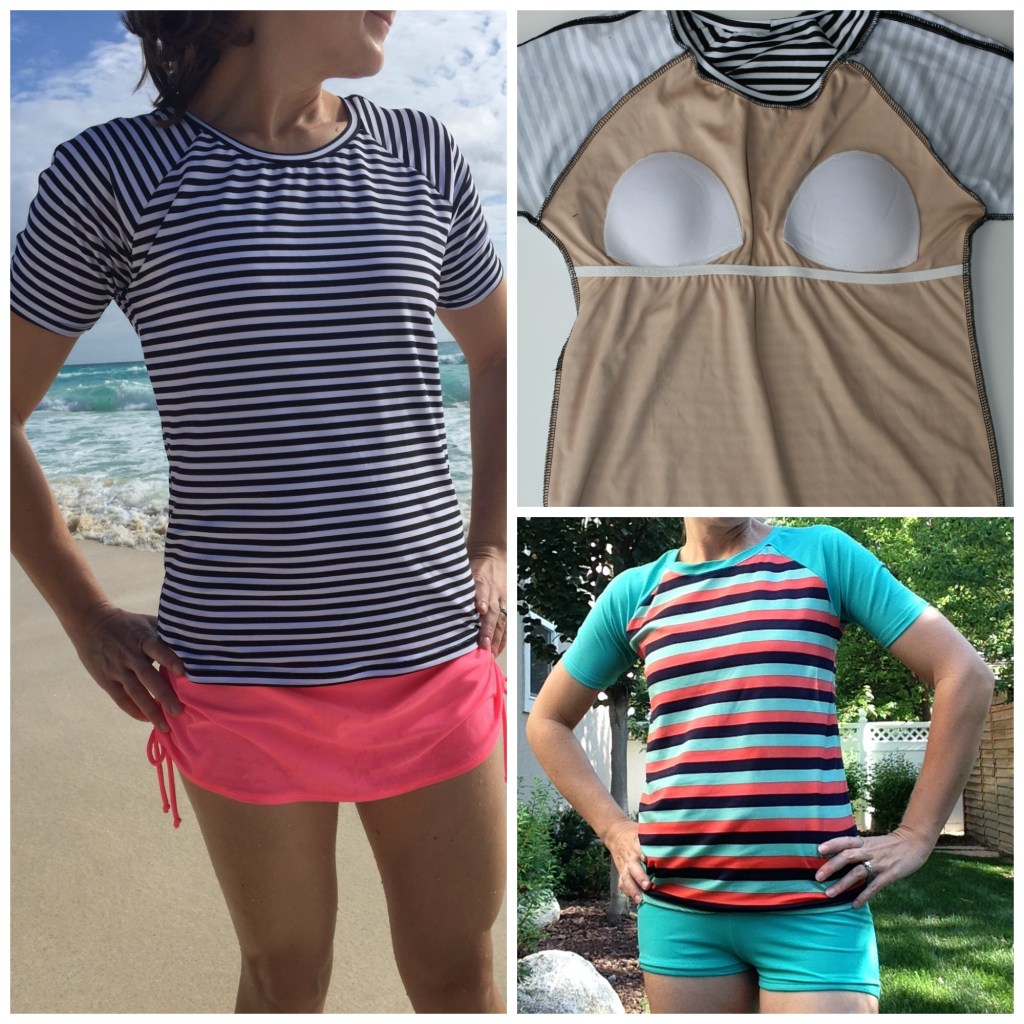
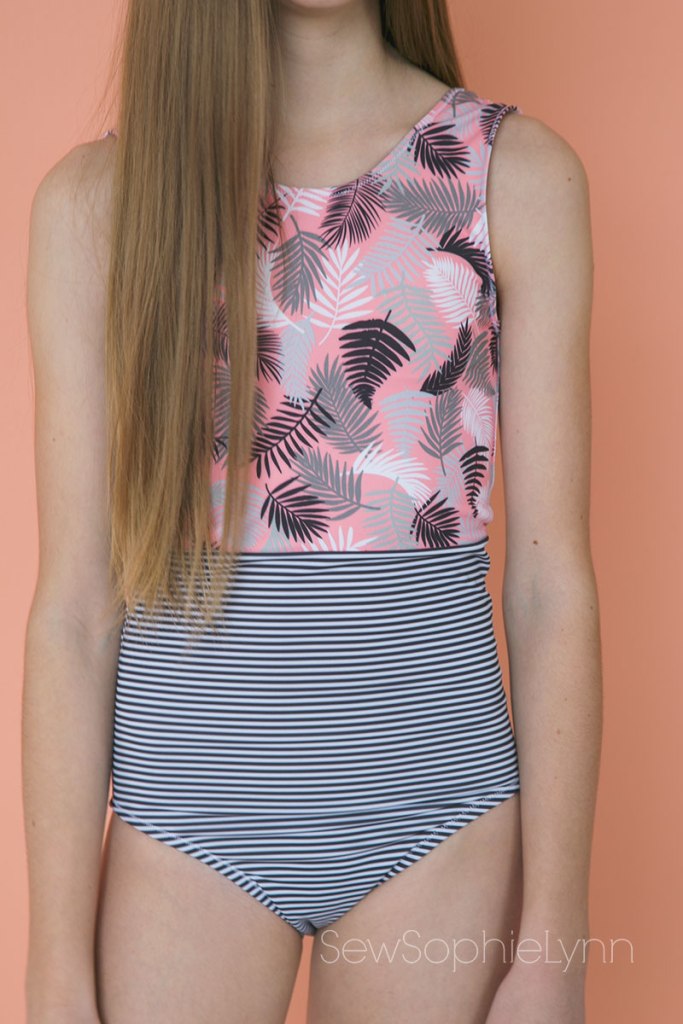
Big sis picked out fabrics and had ideas too but I steered her towards the Xfactor top after sewing my own. She was super easy to persuade and picked out the long sleeves for her version.

I added the same bra cups and shelf bra lining to hers that I did to mine and it gives just the right support for her.

She picked out this Dash Dot Abstract print and then we struggled with what to pair it with. It looked great with the black and white micro stripe as well as the bright yellow solid we had too. We settled on this vibrant lipstick pink and I love the pop of color it brings. We used the Calypso bottoms (they’re her most worn from previous years) and I did the same modification from the past, cutting them at the non-banded line but still adding the band. This gives them a little more height and she likes that her top and bottoms just meet.

Sophie has had this inspiration pic saved and wanted to recreate it. The Viridian from Jennuine Design was perfect with it’s separate panel pieces.

She loved this bold leopard print and then pairing it with black really made it suitable for her. She loves fashion but doesn’t like to draw too much attention to herself so this is the perfect way to wear a bold print like this.

For her top, I lined it in a lightweight techno scuba fabric instead of adding cups. This added a bit of smoothness and was a great solution. I sewed up a straight size 12 with the racer-back and she has a teeny bit of growing room so hopefully this will last all summer.

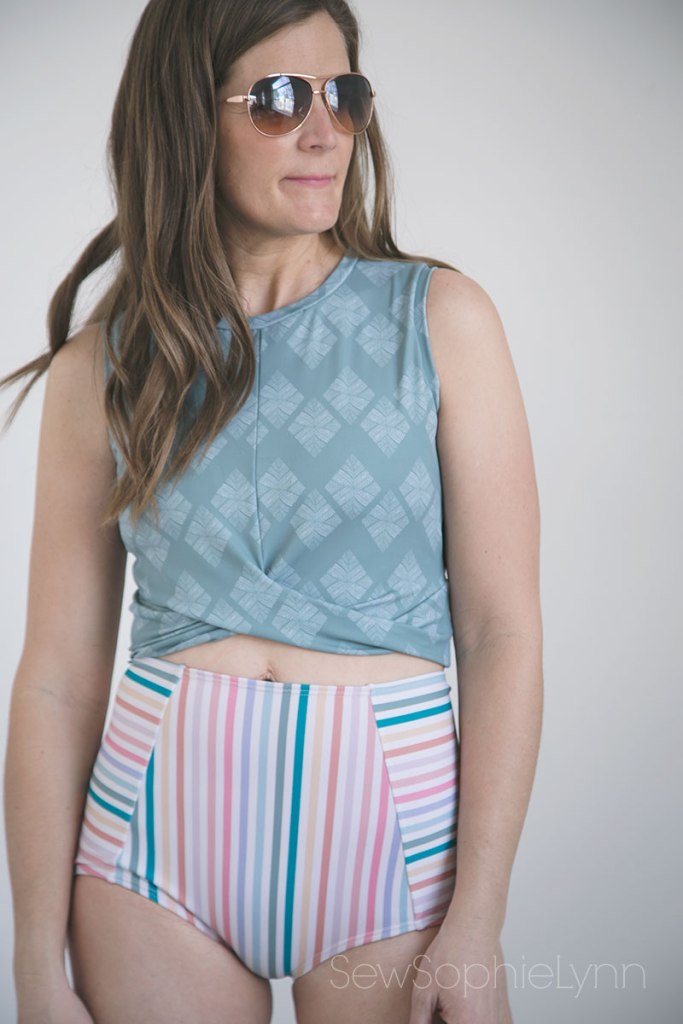
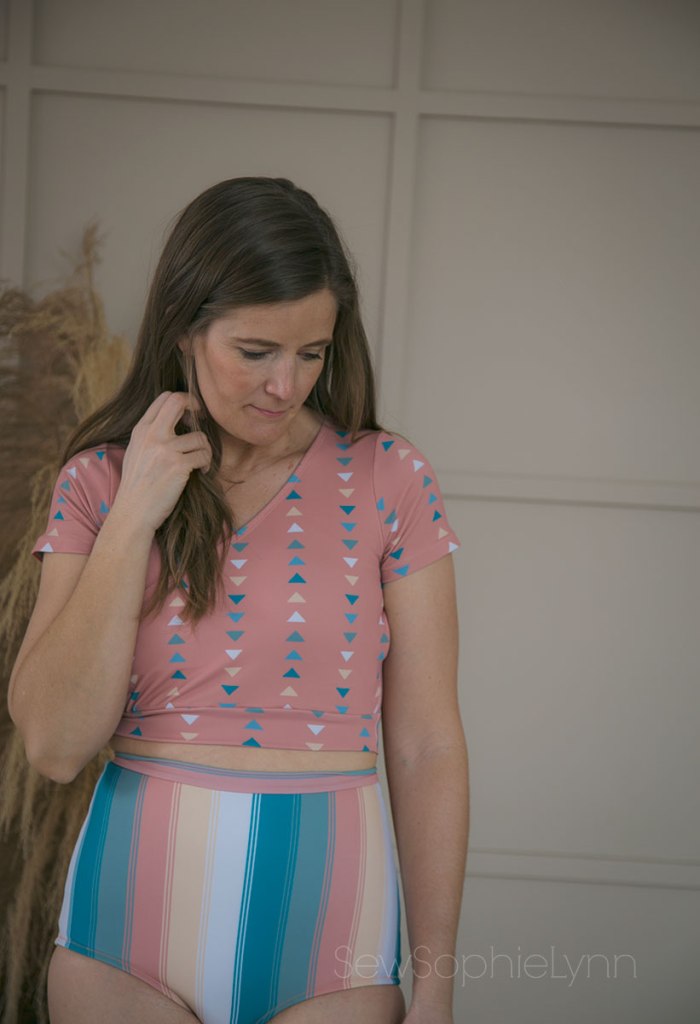
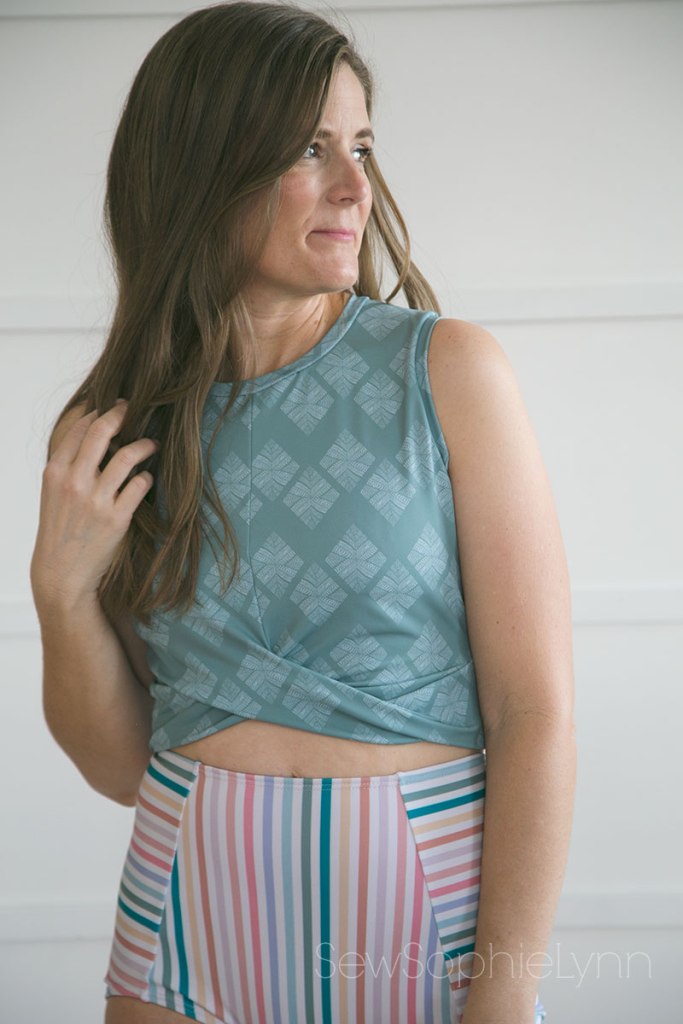
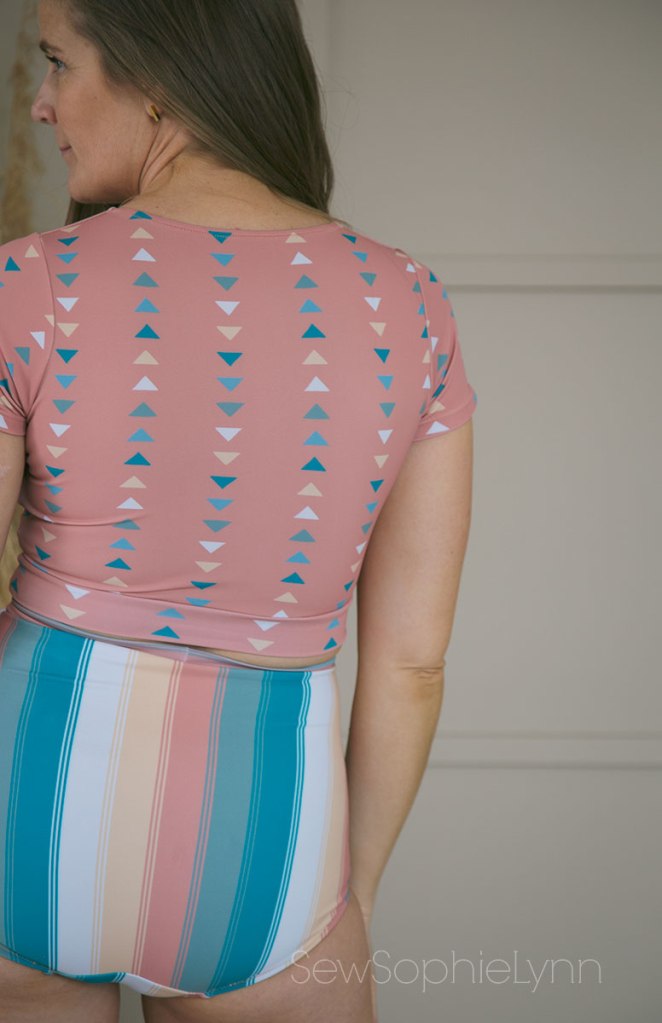
While getting ideas this year we came across this unique top from Albion Fit. She loved it and I immediately started looking for ways to recreate it. It’s a simple peasant style and searched my pattern stash to no luck. I asked in our swim tour group and they were so helpful and I landed on the Gypsy Top from Striped Swallow Designs.

I sewed up a size 12 crop length with short sleeves. We made it so she can wear her Viridian top underneath so this is just like a little coverup top. I made casings instead of following the pattern instructions since she wanted it to look more like the inspiration.

I like the higher neckline but could see her wanting a wider, lower neck in the future. This was a fun, creative make that isn’t your typical swim top and that’s what we love about sewing our own swimwear! It allows you to dream big and try new things.

My girls are loving their new suits and we’re dying for warm weather to break them in! Sewing for tweens and teens can be tricky but I love the collaborative process with my girls. It’s so fun to bring an idea to live and to create suits that fit them so perfectly!

Make sure to check out the other amazing blogger this week! Today’s sewists are bringing it big time!


Made by Kates  Violet and Jewels  Sweet Mama Life  All Things Katy!

Intensely Distracted  Pins & Pinot  My Heart Will Sew On  The Petite Sewist

All My Spare Time  Kara Metta  Handcrafted by RED  Sincerely, Shantelle

Replicate Then Deviate  That’s Sew Kari  Desert Blooms  Boo + Lu


A huge thank you to our sponsors and don’t forget to check out today’s giveaway!!
Again, you can find the tour on Instagram with the hashtag: #suitupforsummer2021


Lowland Kids  Gingham Hive  Striped Swallow Designs  Honeydew Kisses  Little Lizard King  

Jennuine Designs  Greenstyle Creations  Made for Mermaids  Call Ajaire  Hey June  Boo Designs! 

  Sofiona Designs  Love Notions  Lil Luxe Collection  Jalie  Sweet Red Poppy


Riley Blake Stardust

In the middle of all of my swimsuit sewing, I took a break to sew up this sweet dress. I’m really in the mood for all of the warm weather sewing and this dress just hit the spot.

Working with Riley Blake is a treat and I love being able to sew up their new lines. Stardust by Beverly McCullough of Flamingo Toes is such a fun line and was a pleasure to sew up!

I picked Glam Glasses in mint as our main print and paired it with Scallops Peony. I love the retro beachy vibe of the whole collection.

To keep with that retro feel, I sewed up the Byron Bay dress by Little Lizard King. The simple silhouette screams 50’s housewife to me. I sewed up a size 10 according to her measurements and lengthened the skirt a bit for her height (she’s a 14 for height).

The elastic back means this dress will grow a little with her. I love the look of it too!

I kept things simple and used snaps instead of buttons. I can’t remember the last time I used snaps and I love how easy and quick they are!

To finish off the look I sewed up a Lilly Bow Scrunchie from Little Fish. Rachel shares a genius way to make a scrunchie using your favorite hair elastics and the end result is just too cute!

This dress makes me want to head to the boardwalk and eat ice cones as the sunsets. It just makes me think of all the simple pleasures of life!

Suit Up For Summer 2021 Day Three- Sewing for ME!

We’re halfway through this year’s tour and I hope you’re learning lots! I’ve learned we need more swimsuits, lol! I’ve been so inspired by the other bloggers and my sewing list keeps growing with each new make I see. Luckily we can still get 15% off all swim at Raspberry Creek with code SWIMTOUR through Friday.

Every year I try to sew a couple of suits for me but then I get so wrapped up in sewing for all my kids that my own sewing often gets rushed or doesn’t happen at all. This year I was determined to change that! I sewed all of my suits first, even snagging some of the prints my daughter requested for myself, such a bad mom, lol! I know they have PLENTY of suits and she got over it real fast when she saw her own new suits. Plus, the swim season is young and I’m sure she’ll get even more suits by the time the summer is over.

Part of my struggle in sewing for myself is that I have a hard time settling on patterns for me. This year I tried a new to me swim pattern, used my tried and true bottoms pattern, and used a couple of regular top patterns for swim tops that I adore! After seeing what the other bloggers on the tour have sewn up, I think there are a few more adult swim patterns I’d like to try too.

This is the first suit I sewed up this season because I was dying to try this pattern and this print is my absolute favorite from the new RCF swim collection. The colors in this print are so gorgeous and muted and it comes in both swim knit and boardshort fabric. I think it’d make darling little boy swimmers too! This is one of the prints both of my girls were fighting over too but mama won for now.

I sewed up the Midline Swimsuit from Gingham Hive. Ashley is a local friend and has amazing style (check out her Instagram for the proof!). I knew anything coming from her would be well done and this suit pattern is no exception. She has a sewalong on her blog that really helps walk you through anything that might be tricky.

There are multiple support options and you can use this pattern to create a super supportive sports bra as well. I did the shelf bra option and added bra cups. I skipped the extra lining since RCF swim is pretty substantial and the part that really needs it (the bust) has the shelf bra. The bottoms have a genius construction method that leaves you with pretty insides and no exposed seams. I used swim fabric to line my bottoms. I usually use power mesh in the front of my bottoms and didn’t on these. They still feel pretty supportive but I may add it to the front middle piece in the future (I just really love that extra bit of structure it gives). The multiple pattern pieces on the bottom make them fun for color blocking or playing with pattern too.

I am super happy with the coverage of this suit and love that I can mix and match it with the other pieces I sewed up. I’m pretty positive that there will be more Midline Suits in my wardrobe.

Can we talk about this top?!!! This is my absolute favorite piece I made for myself. I love the sportiness of it and the coverage is awesome. I used the Xfactor Top and Dress from Patterns for Pirates. It’s technically not a swim pattern but with a couple of simple alterations it works so well. The pattern has multiple sleeve options and a dress version too. I’m sure I’ll eventually get to all of the options but for now I just want to sew up a million JUST LIKE THIS! I want a couple in my workout wardrobe for summer too.

To make this more practical for swimming, I added a front lining and shelf bra. I cut the lining on the fold (I folded over the front pattern piece on the notch marking) and cut it just under the bust. I added cups to the lining and a taught 1 inch elastic strip near the hem of the lining. The elastic adds support and also keeps the lining in place next to my skin. The rest of the top is a little loose making it comfortable and flattering. That twist in the front is my favorite detail! I sewed up a size small, according to my measurements. If you preferred a tighter fit, you could try sizing down a size.

This pretty sage and white diamond print is such a gorgeous color and pairs so well with so many of the new spring prints as well. It also comes in boardshort fabric and I’m dying to make Charlie a suit out of it.

The bottoms I’ve paired with it are Hello Sailor bottoms, also from Patterns for Pirates. I turn to this pattern year after year for so many reasons. I absolutely love the fit of these bottoms. I sew up a size small and there is quite a bit of negative ease, sucking things in where I need them! I like to use power mesh in between the lining and main fabric on the front from the top of the leg seam to the waist. For these, I used power mesh on the green and brown pair but skipped it on this pair simply because I forgot. I also like to do the waistband slightly wider and add one inch elastic to it but alas I forgot on these ones too (I think I was just too excited to be sewing for myself again!). It doesn’t necessarily need it but when editing these pics I noticed the waistband is rolled in many of the photos. Adding elastic eliminates the rolling and also adds just a little more support too.

I used this green sage cream and brown stripe and also this teal sage deep peach and yellow stripe. With the 4-way stretch these stripes are great to use either horizontally or vertically. I personally love the vertical stripe on my bottom half.

I sewed up one more top and I’m in love! I purchased this top for a vacation earlier this year and loved it so much I wanted to recreate it. I turned to my trusty Willow Wrap Dress pattern from Love Notions. It had the perfect cross front and sleeve options like the inspiration. I wanted to add a little more length than the original and while it did complicate things a bit, it was easy to get the length I wanted starting with the Willow Wrap bodice. For this top, I used the dark peach triangle stripe. I love that this print coordinates with so many prints too and it looks darling with the multi stripe from my Midline Suit too.

I’ll tell you what I did and also what I’d do differently next time. Something about swim makes me less nervous to try new things. Maybe it’s the fact that it takes much less fabric or maybe it’s just a chance to be a little more adventurous. For this top, I cut my pattern pieces out per the instructions, cutting the bodice pieces at the shorten/lengthen line. I also cut two front lining pieces out of white swim fabric. I’m really leaning towards lining all of our suits in swim fabric instead of actual swim lining. It’s softer against the skin and doesn’t get snagged or stretched out with wear. Ok, now we’re going to get a little crazy. I layered my bodice pieces at the shoulder like this- front lining, back bodice right side up, front bodice right side down, and sewed the shoulder seams. This gives you a hidden shoulder seam. Next I sewed 3/8″ swim elastic to the inside of the whole neckline. I used my serger and just pulled it tight as I sewed, not stretching it too much but just enough to help it lay snug against the body. Now flip it to the inside to cover the elastic and secure with a zig zag or coverstitch. Now this is where I’d do things a little differently. I basted my sides and then determined where my cups should go. Then pulled out the basting stitches, sewed my cups in and proceeded to sew the rest of the top. I think it’d be genius if you left a small opening in the lining to add removable cups after constructing the top. This is what my RTW version has and then you can adjust the cups to be exactly where you want them.

After sewing on my cups, I basted the front bodice pieces together, leaving off the main front bodice piece that is on the outside. I sewed a plush 1.5 inch elastic across the underbust for support through the three layers of bodice pieces. Again, I would change that up and sew it just to the side of the bodice that will be on the inside next to your skin. If you didn’t want the longer top length, you could omit this all together. My rtw version just has elastic in the bottom band and it hits right under the bust so it’s very supportive. After you finish the front bodice construction you will sew the sleeves and side seams according to the pattern. To finish it off I sewed a band to the bottom of the bodice.

Did I thoroughly confuse you?! There’s a reason I don’t write tutorials, lol! When I do stray from the pattern, I usually wing it and hope it all works out. If you do feel like giving this a try, don’t hesitate to reach out to me and hopefully I can help you out. More than likely, you all have a better, easier way to do it and you can pass those tips along to me!

I did my pictures after grabbing my kids photos and I couldn’t get my remote to work right so my youngest two got to man the camera. I set up the tripod to make it as easy as possible for them and all they had to do was hit the button. I’d ask if I was in the frame and they said yes every.single.time! And guess what, most of the pics I am in the frame even if just barely, lol! I laughed and laughed as I scrolled through the hundreds of pictures they took and this gem right here is me taking tips from my sassy tween.

I’m so excited to have a new set up suits for summer! I’m so looking forward to pool days (even if they’re kiddie pool in the backyard days like last year!). I want the warmth and lazy days right about now.

I hope you’re following along this week as we showcase all of the amazing swim fabrics Raspberry Creek Fabrics has to offer. A huge thank you to all of our sponsors for donating patterns to our team of bloggers as well as patterns and shop credits to our daily giveaways. This sewing community is really the best!

Please stop by all of the other stops on the tour this week. Today’s bloggers have more cute adults suits as well as some darling little girls suits!

Sew Mary Mac  Merritts Makes  Wild + Wanderful  Call Ajaire

Made by Kates  Violet and Jewels  Sweet Mama Life  All Things Katy!

Intensely Distracted  Pins & Pinot  My Heart Will Sew On  The Petite Sewist

All My Spare Time  Kara Metta  Handcrafted by RED  Sincerely, Shantelle

Replicate Then Deviate  That’s Sew Kari  Desert Blooms  Boo + Lu


Titchy Threads  Sew A Little Seam  Simple Life Pattern Co.  Pattern for Pirates  Ellie and Mac  

Lowland Kids  Gingham Hive  Striped Swallow Designs  Honeydew Kisses  Little Lizard King  

Jennuine Designs  Greenstyle Creations  Made for Mermaids  Call Ajaire  Hey June  Boo Designs! 

  Sofiona Designs  Love Notions  Lil Luxe Collection  Jalie  Sweet Red Poppy


Suit Up for Summer 2021 Blog Tour Day Two- Adding Graphics to Your Swimwear

It’s day two of the Suit Up tour and I hope you’ve already been thoroughly inspired. Today I’m sharing my tips for adding graphics to your swimwear and a happy little discovery!

The techniques I share work great for embellishing rash guards but they’ll also work well for the front of a swimsuit or wherever you’d love a little something extra. For my kids tops, I turned to two of our go-to patterns: the Hey June Camden Raglan and the Titchy Threads Rowan Tee. I use these patterns often in their everyday wardrobe and they work great for swim tops too. Both of these patterns are slimmer fitting making them perfect for the pool.

I sew up my boys rashguards exactly like I would a tee shirt but for my girls I make a couple of simple alterations. I like to line the front of theirs with an extra layer of swim fabric for a little more coverage. When cutting this lining piece, cut it slightly shorter than your outer piece so you aren’t folding it up in the hem. I also cropped this top 2 inches to better suit wearing it with all of their high waisted swim bottoms. If you’d like even more chest coverage you can follow Nicole’s easy tutorial to add a shelf bra or head to my post from last year to add swim cups as well.

I love any chance I get to pull out my Cricut and adding a little personality and pizzazz to their pieces. For these tops I used stretch vinyl and Cricut Infusible Ink. In the past I’ve used Cricut SportFlex HTV and I’ve been thrilled with the results. I use my Cricut EasyPress and their swim tops have held up year after year (until they’ve outgrown them but they still look brand new when we pass them on!). I swear by Teflon sheets when using iron-on vinyl. They add a layer of protection to your garment and also seem to help the vinyl melt into the fabric better. When pressing SportFlex on to swim fabric I set my EasyPress to 305 degrees and do 30 seconds on the right side then flip it and do 15 seconds on the back.

This year I headed to my local vinyl shop, Vinyl Outlet, and picked up these three stretch vinyl sheets. You want to look for stretch vinyl since knits, especially swim, will be stretched when worn. I’ve heard great things about this stretch vinyl so I’m hopeful it will hold up as well as the SportFlex. There were so many colors to choose from that I’d love to be able to match all of the RCF swim fabrics! I designed this digital design and it’s available in the Project Run and Play shop.

For this one, I was dying to try Cricut Infusible Ink. Cricut recommends only using their blanks but that is so limiting. With a little research I found that many had had great results using synthetic fabrics, perfect for this poly spandex swim knit! I did a couple of test swatches and then went for it. I recommend doing all of your embellishing PRIOR to sewing up your pieces. 1- it’s easier to lay our your fabric and 2- it’s not quite as heartbreaking if you mess up!

For this design, I used a graphic available in Design Space and Bright Teal Infusible Ink. I followed the instructions for cutting and fusing the ink (using the Heat Guide here) and it worked beautifully! I love seeing that ink just melt right into the fabrics. I talked to Diana of Raspberry Creek Fabrics and she said the infusible ink process and setting temperature is similar to what they use in their shop when printing swim fabrics so the result should be easy and long lasting.

These both have their pros and cons. The infusible ink will only work on white, possibly light colors, while the vinyl will work on any solid or print. The infusible ink melts into the fabric making it a great choice if you want to add sizing labels to garments without the itchy tag or vinyl. Vinyl is fun to layer and you can create more complicated designs with it. I’m just excited to have options when it comes to creating unique looks for my family!

My little guy got two new suits this year. And I promise he wasn’t as miserable during this shoot as his pictures look! This studio looks out over a busy street and this boy is so car obsessed he hated missing watching them, even for the few minutes it took to take these photos.

His first suit is a Lowland Kids Swim Brief. This pattern is unique because it uses swim knit making is especially soft and great for kids with sensory issues (there’s instructions to fully enclose seams too!). I used this teal tie dye print that I think is perfect for the whole family.

His second suit is Jennuine Designs Cobalt Boardshorts. I like the clean flat front and elastic back. He likes the pockets! I used this Teal Wave Print, another classic print that I think all of my boys would wear.

This is his “I’m not trouble, you’re trouble” look!
And this one is his “What?! I’m smiling, I promise” reaction.

I hope you’ll follow along all week as these incredible bloggers show off their new swimwear! I promise you’ll be in love!

And make sure to pick up your swim fabrics this week at 15% off with code SWIMTOUR.

Sew Mary Mac  Merritts Makes  Wild + Wanderful  Call Ajaire

Made by Kates  Violet and Jewels  Sweet Mama Life  All Things Katy!

Intensely Distracted  Pins & Pinot  My Heart Will Sew On  The Petite Sewist

All My Spare Time  Kara Metta  Handcrafted by RED  Sincerely, Shantelle

Replicate Then Deviate  That’s Sew Kari  Desert Blooms  Boo + Lu


Titchy Threads  Sew A Little Seam  Simple Life Pattern Co.  Pattern for Pirates  Ellie and Mac  

Lowland Kids  Gingham Hive  Striped Swallow Designs  Honeydew Kisses  Little Lizard King  

Jennuine Designs  Greenstyle Creations  Made for Mermaids  Call Ajaire  Hey June  Boo Designs! 

  Sofiona Designs  Love Notions  Lil Luxe Collection  Jalie  Sweet Red Poppy


Suit Up For Summer Blog Tour 2021 Day One

I’m so excited to be co-hosting the Suit Up for Summer blog tour again with Karly of Paisley Roots. We hosted our first Suit Up Tour way back in 2017 and the last two years have co-hosted the tour featuring Raspberry Creek Fabrics. Sewing swimsuits is one of my favorite things and this tour always gets me so excited for pool days and sunshine! To get you started on your own suits this year you can use code SWIMTOUR to get 15% off swim fabrics all week long.

This year I sewed up almost twenty different pieces and can’t wait to show them all to you this week! Raspberry Creek’s swim fabrics this year are sooooo good and were so much fun to work with. I loved that my kids and I got to really pick fabrics that suited us and we’re just itching to hit the pool now!

You can find our first year of the swim tour here. I give tips for adding a shelf bra to your favorite raglan or tee pattern for a supportive rash guard. I rounded up girls and women’s swim patterns, sewed the most complicated swimsuit to date (I’ve yet to tackle that pattern again), and even did coordinating family suits. Looking back at these pics brings me back! My kiddos have grown so much since then! Would you believe that Sophie is still trying to squeeze into that darling black and white stripe rashie suit?!

2018 wasn’t a tour year but that didn’t mean there wasn’t swimsuit sewing. This was the year of the Made for Mermaids Mermaid Shores collection and we were instantly smitten! The Calypso, Camila, and Lainey are still go-to’s at our house and I sewed up more Calypso’s this year too! If you are a beginner at sewing swimwear, I highly recommend Made for Mermaids for their spot on fit and excellent construction and instructions. I also love that some of these suits have held up so well and are still in rotation!

2019 brought more gorgeous Raspberry Creek swimwear as we hosted the Suit Up tour through the then new RCF blog. I love looking at the huge variety of prints from that year from bright bold florals and stripes to that soft pink floral. Those black Hello Sailor bottoms are my most worn swim piece ever! Classics like that are the best!

Last year’s tour was epic. It was at the beginning of the pandemic and sewing swimsuits seemed both silly and also just the distraction we all needed. The hope of sunny days ahead kept us going and these fun prints were such a joy to work with.

As you can see, sewing swimwear is something I never get tired of. You can search this blog for all of my past adventures in swimsuit sewing or simply click here. I also have a post over at Cali Fabrics full of all my favorite tips to make sewing swimwear a dream!

Make sure you check back in all week for this year’s new suits! I’m happy to share this tour with an amazing group of bloggers too!

Sew Mary Mac  Merritts Makes  Wild + Wanderful  Call Ajaire

Made by Kates  Violet and Jewels  Sweet Mama Life  All Things Katy!

Intensely Distracted  Pins & Pinot  My Heart Will Sew On  The Petite Sewist

All My Spare Time  Kara Metta  Handcrafted by RED  Sincerely, Shantelle

Replicate Then Deviate  That’s Sew Kari  Desert Blooms  Boo + Lu


Titchy Threads  Sew A Little Seam  Simple Life Pattern Co.  Pattern for Pirates  Ellie and Mac  

Lowland Kids  Gingham Hive  Striped Swallow Designs  Honeydew Kisses  Little Lizard King  

Jennuine Designs  Greenstyle Creations  Made for Mermaids  Call Ajaire  Hey June  Boo Designs! 

  Sofiona Designs  Love Notions  Lil Luxe Collection  Jalie  Sweet Red Poppy


And a huge thank you to our sponsors. There will be daily giveaways over on the RCF Instagram that you don’t want to miss!

Project Run and Play Pantone Party featuring Art Gallery Fabrics

Project Run and Play is hosting a month long event in honor of the Pantone colors of the year, a Pantone Party! A party all about colors, fabrics, and sewing for my kids- I’m 100% in! Read to the end to find out how you can get in on the fun too!

The Pantone colors this year are Ultimate Gray and Illuminate, a bright vibrant yellow. I love that these colors have opposing feels- the gray is calming and basic and the yellow is cheery and bright, but together they highlight the best of both. It was fun to create looks that spoke to these colors and what they represent.

I was lucky enough to get to work with some amazing Art Gallery fabrics paired with patterns from the Project Run and Play shop. We’ve had glimpses of spring weather and these looks will be perfect for the season ahead.

Sophie is growing out of most of her dresses (she’s grown 3 inches in a year!) and I knew I wanted to do a cute dress for her. I love Art Gallery stripes and picked Striped Bold in Graphite for her look. Art Gallery knits are such a great medium weight and have great recovery and softness. I think they work well for tops, dresses, and leggings.

I used the Story pattern for her dress with a few alterations. I skipped the bottom sleeve piece and created a cuff piece instead so that she has a cute short sleeve. I also used inseam pockets from another pattern. A dress is ALWAYS better with pockets and I think the inseam pockets add a little more grown up look compared to the kangaroo pocket included in the pattern.

I think this dress will be great all summer long and will even work well as a swim coverup. After taking these pics I was reminded that I have my own version of this too! We can totally be twinners (and I can unapologetically embarrass the heck out of her!)

Charlie got a simple, classic summer boy look. A tee and comfy shorts and he’s a happy camper!

For his top I used Striped Alike Grey paired with solid Daffodil knit. I sewed up the color block option of the Lemon Tee (are you sick of seeing my kids in this pattern yet? I hope not because I’m not giving it up any time soon!). This pattern is so loaded with options and I love when the pattern does all the work for me.

My boys (including the hubs!) are super into trading cards these days and the ultimate score is getting a numbered limited sports card. I knew adding a little 1 of 1 to this Limited Edition graphic would be the perfect touch for this kid. Super personal and oh so true about all of his mama-made makes too!

For his shorts I used the Prose Cargo Joggers. They are the perfect woven jogger pattern and it’s loaded with options too! I sewed up the shorts version, leaving off the side cargo pocket. I love the little hidden side pocket and so does he! I used an Art Gallery Denim in Clouded Horizon. This is actually the ‘wrong’ side of the fabric. The front features a cool crosshatch pattern but I loved the more subtle look the back side gave. It’s a great mid weight denim that was perfect for these bottoms. And if you know this little guy, they got the softness approval which is huge for a denim bottom!

Can I indulge you in a little parenting story?! This little man was BEGGING for a haircut after letting his hair grow out all winter. We loved his curls when done just right but most of the time it was a crazy mess. He loved the length but complained that the sides were constantly getting pulled by his masks (something we never had to deal with in the past!). His solution was to just cut the sides and leave the back so he could have the best of both worlds. Yep, business in the front and party in the back. I took him to the salon and really hoped he would hate it once she did the sides and agree to a full trim but that grin when he saw himself in the mirror with just the sides trimmed up- oh man, I was putty in his hands. And now I have a kid with a mullet and I’m honestly ok with it. Is that what happens with the baby? You just give up? I like to think that I know what battles to pick and also how important it is for them to be themselves. At nine, he’s totally entitled to his own opinions and I want him to feel comfortable being just who he wants to be. Luckily right now it’s just about a haircut!

Ok, back to what you came for- the sewing! For Payton’s look I knew I wanted to use a fabric that would tie all of the looks together. This pretty floral, Fields of Goldenrod, was too perfect! Art Gallery quilting cottons are lightweight but have a drape and feel unlike most cottons. I love using them for dresses and other garments.

For her dress, I sewed up the Robin Dress. This pattern is full of cute details and like I often do, I left them all off! I think for tweens, the simpler the better!

I did the open back, short cuffed sleeve dress with ties. It’s such a classic silhouette!

For this shoot we headed to the local middle school common area. We were surrounded by a group of high school skateboarders as we shot and I love how my kids acted like it was totally normal to be taking pictures there. You can tell some were more comfortable than others. That cute yellow lunch table and stark grey concrete walls were just too perfect for this party!

As part of the party, Raspberry Creek Fabrics is giving away two $50 gift certificates! You can join the sew along for your chance at these amazing prizes. Make sure to check into the PRP blog every day to get more incredible Pantone inspiration (did you see last weeks AH-MAZING looks?!!!). Thanks for joining the fun!

Hey June Sitka Sweatshirt

The newest Hey June Handmade pattern has arrived! I was lucky enough to test the new Sitka Sweatshirt and you know it’s a good pattern when I make multiples during testing.

The Sitka is a ‘shrunken’ fit sweatshirt pattern that is that perfect in between fit of crazy relaxed and fitted. It’s designed to hit at your high hip making it perfect for both your high-waisted and mid-rise bottoms. There are three bodice options- plain front, two-piece, and three piece chevron color block. There are two size ranges 0-20 B-cup and 14-30 D-cup.

I sewed up this view A as my ‘muslin’. I used incredible bamboo sweatshirt fleece and matching ribbing from Raspberry Creek Fabrics, with total trust in Adrianna and knowing this pattern was very forgiving. This fabric is so heavenly and this pattern is perfect for it! I’m dying to use all my scraps for a view C (it’s so perfect for all those yummy leftovers you can’t bear to part with!).

My upper bust measurement puts me in a size 4 with a size 10 waist and back down to a 4 in my hips. With the relaxed fit of the pattern, I sewed a straight size 4. It fits good but I forget how my small bust measurements don’t quite take into account my broad shoulders or biceps. This fabric has plenty of stretch and this top is still uber comfortable but I did choose to size up for my next one.

For my second one I got brave and used a print for the top. This marble swirl from RCF’s new spring line is one of my favorite prints ever! I tend to gravitate more to solids in my everyday dressing and was nervous I wouldn’t wear a full printed sweatshirt as much. This color blocking option is just perfect though! A little party on top but not too busy. I paired it with blush pink french terry and white french terry for the bands.

Bumping up one size gave me just the right wiggle room and I love, love the fit of this one!

Adrianna has done it again! Make sure to head over to her blog for all of the incredible tester makes and to grab your copy!

Faith, Hope, and Love Fabric from Riley Blake

I’m always a sucker for Sue Daley’s lines at Riley Blake and her newest Faith, Hope, and Love line is another winner. I’m always drawn to her style and color palettes and this line will draw you in too!

The pretty pinks, muted golds, deep charcoal, and pale blues are so good together. Throw in simple prints, darling florals, and a vintage feel and this collection is giving me all the heart eyes!

I got Stems in Charcoal and Geo in Antique Gold and was seriously tempted to use them both for myself. I love that these prints aren’t too bold and are fantastic blenders but also work so well on their own. They’re subtle and classic- my favorite combination!

With snow in the forecast, we decided to have a little fun for this shoot. We headed to our favorite little wooded park and had so much fun. It was just cold enough to snow (it wasn’t cold enough to stick to the roads) but not windy or too cold to play in. Payton, in her little short sleeved top, didn’t complain a bit and just loved the novelty of shooting with those big gorgeous snowflakes falling around us. It was a magical moment with my girls and I’m glad to have these pics that captured it all!

This girl has a closet full of dresses and asked for a top this time. I used the Odeline Blouse from Iris May (available in the Project Run and Play Shop). I used this pattern once before and we both loved the top so it was about time we revisited it. The pattern is full of options (like the cute ruffles!) but we stuck with just the simple neck ruffle again.

The pattern does not include seam allowances (are we just spoiled in the US?) and that always intimidates me. I used the two pencil method to trace the seam allowance and it was a quick and simple step that I really need to not stop me in the future. I’m always worried that I’ll do it wrong and end up with an ill fitting garment but the directions are very clear as to where to add the seam allowances and it really just took a few extra minutes.

That pretty button placket in the back is so cute!

This cute teen is inching her way into women’s sizing and I’m always excited when I find more of my patterns that fit her. The Justine Skirt from Ready to Sew comes in sizes 32-52 and was perfect for her. I love that all of the proceeds from this pattern are donated, making it a great one to have in your stash.

The skirt features a fitted waistband (no elastic), button front, and nice big pockets. You can see my other version here for more of those pretty details.

I love the cute midi-length which makes it so versatile. It’s super cute with boots for winter but will also pair so well with a tee and sandals come summer.

I’m grateful for Riley Blake and these cute fabrics. It’s so fun to sew them up and get to see them on my girls! They love their new pieces!

PRP Mini Season: Comfort Encapsulated

It’s with mixed emotions I bring you this post. I’ve joined in Project Run and Play Mini Season 2 as a last minute replacement for our dear friend Gemia Carroll, who tragically lost her oldest daughter this last week. My prayers are with Gemia and her family in this tender time and I’m so grateful for this community and the way they have rallied on her behave. While I love a good PRP challenge, sewing and photographing our looks in a weekend provided an added obstacle. Lucky for me, my family was up for the challenge as well. You can head over here to vote and to check out my competition.

The theme for this week is Comfort Encapsulated and if you are a follower of mine you know just how perfect that was for me and these kiddos. This season is focused on the Project Lounge Library patterns and that was another reason for me to jump on board. The Lounge Library patterns are some of our favorite PRP patterns and just work so well for our lifestyle. They are easy to wear and sew up so quick. I was able to sew Friday and Saturday and my kids were happily wearing these on Sunday.

I picked our theme, Easy Like Sunday Mornin’, because Sundays have become the perfect family day this past year. We usually do a quick Zoom or in person church service in the morning and then get to spend the rest of the day lounging and enjoying each other’s company. We binge watch tv shows, play all the board games, bake cookies and cakes, do puzzles, and recently joined the Nintendo Switch world and like to get our Just Dance on. Sunday’s are all about comfort and these outfits are meant for these lazy days.

When it comes to comfort, it’s all about the fabric, right? I’m lucky enough to live just down the street from Raspberry Creek Fabrics so my first stop in planning was to raid the fabric racks. These fabrics are all sponsored by RCF and I don’t know what my kids would be wearing without Diana and her magic fabric shop. Raspberry Creek Fabrics is known for it’s huge selection of cozy knits and it was the perfect place to get started. I grabbed silky double brushed polyester, cozy waffle knits, plush sweatshirt fleece, and soft ribbed knit. I love that I was able to find coordinating prints and solids that work so well together.

Charlie is all about comfort and hates anything stiff or itchy. I usually have to bribe him to wear jeans so I knew he’d be so excited about these denim look joggers. I used a double brushed polyester for pants that are so soft. He says these are his most comfortable pants ever! I used the Joseph Joggers and adjusted the waistband for a wider elastic. A little added top-stitching and these are the perfect little boy pants.

His top is a Theodor Raglan with the George hood added. Sewn up in camo and rust waffle knit with soft ribbing cuffs, it’s such a cozy top! The Theodor is a favorite of mine now. It’s a great loose fit and such a fun sew. I like to add top-stitching where I can and I think it really elevates it. Throw on a couple of tags and I think this top passes the ‘cool’ test for sure.

To finish his look, he got a Bookish Beanie out of the charcoal ribbing lined with the heather grey ribbing. He’s growing his hair out and I love that he can throw on a beanie for those not-so-great hair days.

Payton is my busy bee and loves to really relax in her rare spare time. I knew a cute lounge set would be perfect for her. She’s totally obsessed with rib knit and she’s living her dream in this head to toe look.

We picked this pretty floral rib knit to coordinate with her siblings. I sewed up a Story Top for her tee. She’s loving mock necks right now so I used two back bodice pieces and added a tall mock neck band. I also cropped about four inches off of the top length to give her this cute cropped length.

The pants are the Nini Noni Pajama pants just slightly modified with a wide yoga waistband. Skipping the elastic waist really ups the comfort factor!

Sophie is on top of all the latest trends and wanted a cute sweatsuit. It was fun to brainstorm and come up with the design for this adorable set. I used the Joseph Joggers and George Hoodie for her look. She’s getting so close to outgrowing most children’s patterns and I’m pretty sure I’ll cry big crocodile tears when that day comes. She’s just at the top of these two patterns size charts and I was glad I could squeak this outfit out for her.

She got all of the yummy sweatshirt fleece for her outfit. I used a combo of light grey, mustard, and mauve. RCF sweatshirt fleece is super plush on the backside and oh so cozy!

The color blocking on this sweatshirt was my biggest challenge and so much fun to come up with. We searched Pinterest for ideas and boy are there some incredible looks out there. I don’t color block often and now I’m wondering why. It adds so much to a simple silhouette. For her hoodie, I chopped off three inches and added a drawstring hem casing.

I added a wide twill tape side stripe to her joggers. I also used cuff ribbing for the ankles and wrist bands to tie the two pieces together.

For this shoot I went back to our PRP roots and headed to our local parking garage. I’m pretty sure the first time I shot here was for week 3 of Season 15, our Shine Bright looks. I loved our shoot that day and have since used this location a TON! It’s perfect in winter or rainy weather because you still get lots of light but are protected from the elements. I love the neutral backdrop that really lets the colors and outfits take center stage.

You can head over to Project Run and Play to vote for your favorite looks. This week I am competing against Carin of Art Bella Creates. I absolutely adore Carin’s style and she always blows me away with her creations so I know I’m in for tough competition this week. Thanks for all your support and make sure you join in the sewalong with this mini season!

Rocky Mountain Wild by Corinne Wells for Riley Blake Designs

Over the years, I’ve made many sewing friends and it’s been fun to meet them in real life. It’s rare when a real life friend comes into your sewing world. I’ve known Corinne Wells for years and to see her beautiful work become fabric has been such a treat! Her newest venture with Riley Blake Designs is absolutely gorgeous and it was so fun to be able to sew up her designs. Her line Rocky Mountain Wild is now available at your favorite quilt shop.

Rocky Mountain Wild is full of pretty prints inspired by the beautiful mountains that surround us. From lovely wildflowers to quaking aspen trees, these prints bring to life spring in our area. I feel so lucky to live at the base of these mountains and the year round beauty they bring. Currently covered in snow, they stand majestic and tall. Come spring they are bursting with color and life and provide such a comfort and peace to me. I love that Corinne drew on these mountains as inspiration and the collection really speaks to their beauty.

As I sewed up these prints, I envisioned styling them with chunky tights, boots and warm beanies and doing our photos in the actual Rocky Mountains. Through a series of crazy events, these pictures are taken in the opposite of picturesque mountains, instead on our quick escape getaway to sunshine and sand. It has made me excited at how versatile these prints are and how great they are year-round.

For these dresses, I knew I wanted to draw on the prairie-chic looks that are everywhere these days. Something loose and non-fussy, I searched my pattern stash and actually tried a new pattern I’ve been wanting forever too. Sophie is in a hacked Hinterland Dress by Sew Liberated. Payton is in a Spencer Dress from Violette Fields Threads.

I sewed up the smallest size (she is just under the measurements) and used two back bodice pieces. She didn’t need the bust shaping and I knew the front neckline would be a little low for her liking. I skipped the button placket and because this has no closures I lowered the front neckline three inches to be able to fit over her head and give her a little room in the neckline in front.

Side note- the walls of our resort are all this pretty pale yellow color and we laughed that she just camouflaged right into them!

She loves the loose styling and this will be such a cute dress to throw on. I’m anxious to make this pattern again and maybe try the placket as well.

Payton described the dress that she wanted out of this fabric as “Ya’ know, kinda flows out from here (under the arms) and no ruffles!” I searched my pattern stash for a-line dresses and the Spencer was the winner. I’ve made two in the past (one for my niece and one for Sophie) and have always loved them.

That little yoke and the puff sleeve are so cute! I modified the sleeves to omit the cuff and placket and I just did a simple elastic casing. I wasn’t sure if she’d want them 3/4 length or chopped to short sleeves but she was a fan of them just like this.

The full back button placket is one of my favorite details.

I loved everything about these dresses! Getting to work with fabric designed by an incredibly talented friend is such a treat. I hope you guys can get your hands on these beautiful prints!